

Table of contents
- Overview of Depth-First Search
- Generating the Maze
- Step 1 - Setting up the environment
- Step 2 - Setting up the HTML
- Step 3 - Setting up the CSS
- Step 4 - Get the canvas element and set its dimensions
- Step 5 - Get the 2D drawing context of the canvas
- Step 6 - Render the gameboard
- Step 7 - Specify cell row, column and size.
- Step 8 - Create the cells template
- Step 9 - Create a method to render the cell
- Step 10 - Fill the gameboard with cells
- Step 11 - Create the DFS algorithm
- Step 12 - Mark currentCell as visited
- Step 13 - Get adjacent cells of the current cell
- Step 14 - Create getAdjacentCells function
- Step 15 - Get unvisited adjacent cells
- Step 16 - Create the stack
- Step 17 - Determine the next Cell to visit
- Step 18: Create a function to remove cell walls
- Step 19: Remove the walls between currentCell and nextCell
- Step 20 - Redraw the canvas to show changes
- Step 21 - Turn the next cell to the current cell
- Step 22 - Add visuals to the gameboard
- Step 23 - Backtracking
- Solving the Maze
- Conclusion
In this in-depth guide, we will delve into the process of generating mazes from scratch using the Depth-First Search algorithm.
Consider this tutorial an introduction to the world of algorithms. As developers, learning this does not only improve your problem-solving skills but also be a cool project to include in your portfolio or to show your peers.
To follow along with this tutorial, you only need a basic understanding of HTML, CSS, and JavaScript. This tutorial will guide you through each step in a simple and understandable way.
Overview of Depth-First Search
Depth-First Search (DFS) is a recursive algorithm for deeply exploring and navigating through linked nodes. It's like trying different paths to solve a puzzle and going back whenever you reach a dead end.
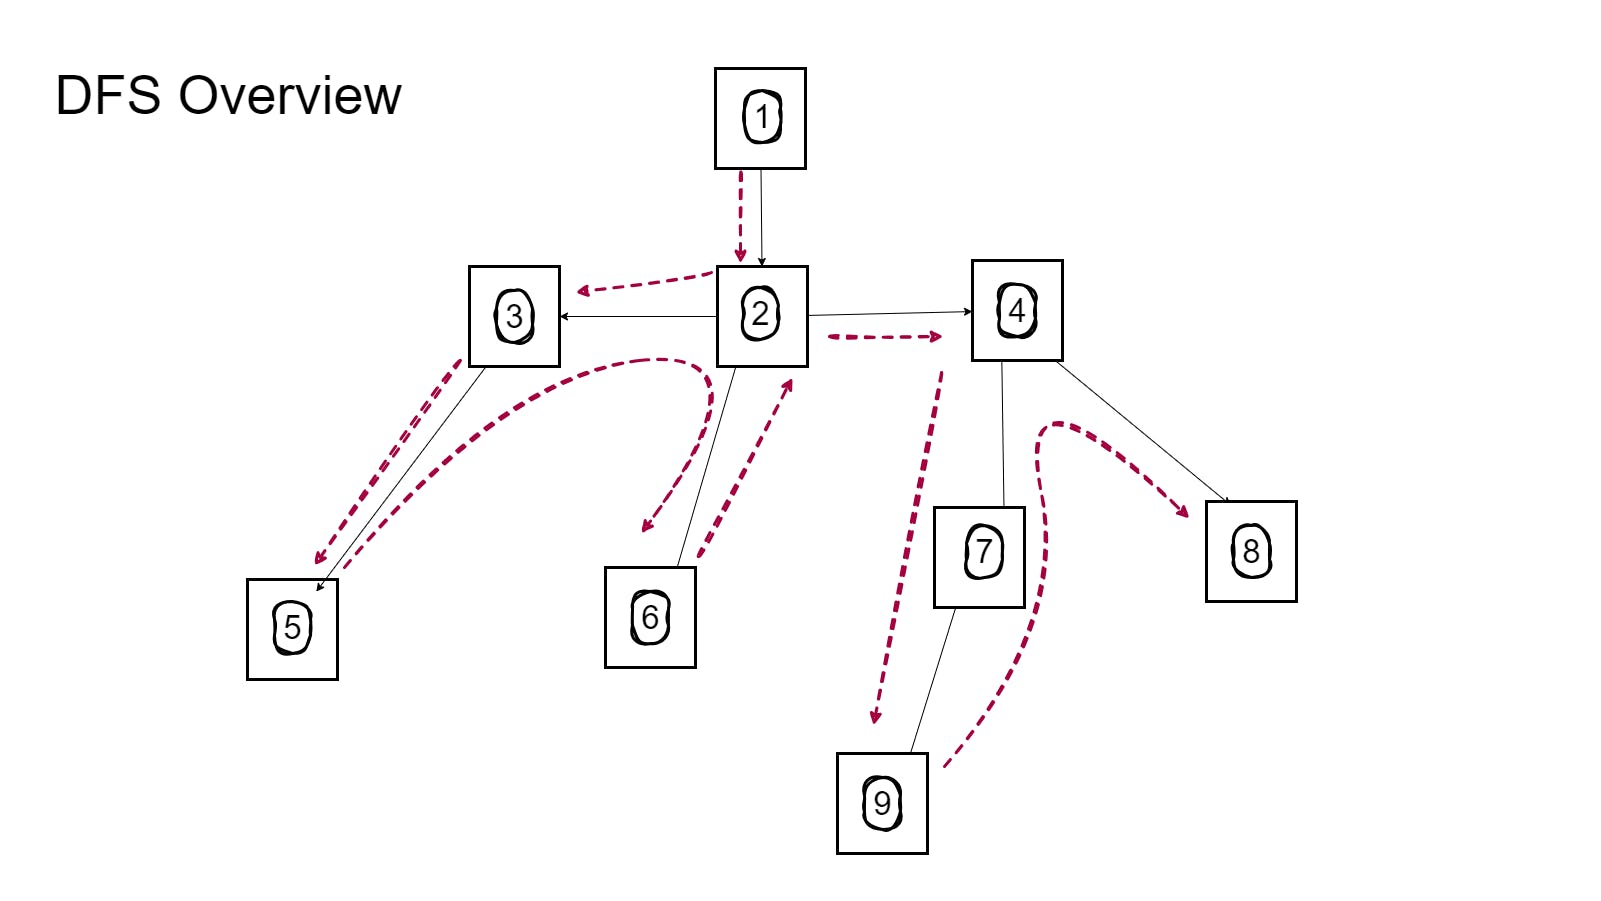
The core idea behind DFS is to go as deep as possible on a path before backtracking. It picks a starting point and follows one path until it can't go any further. Then it backtracks and tries another path that it hasn't explored yet. It keeps doing this until it has checked all possible paths.
Generating the Maze
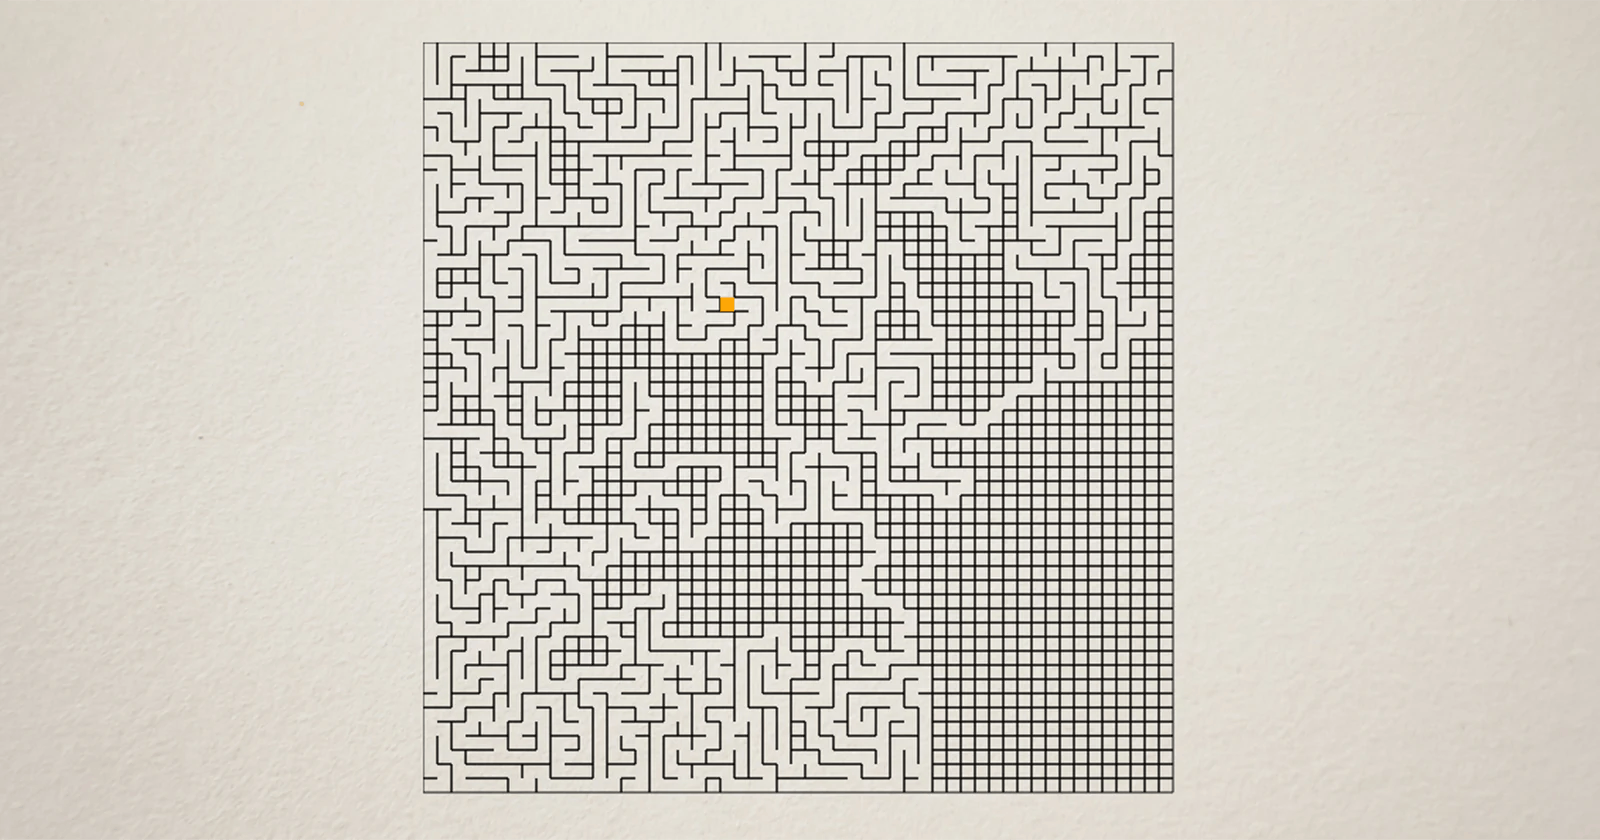
This section includes everything needed to build a maze from the ground up. But first, let's take a look at what we are about to build. Here is a live demo of the maze, and the full code is also available here.
Step 1 - Setting up the environment
Open your code editor and create a new project folder. Let's name it The Maze. Then in this folder, create three files: index.html, index.css, and index.js.
In the index.html file, fill it up with the basic HTML structure and link the index.css and index.js files:
<html lang="en">
  <head>
    <meta charset="UTF-8" />
    <meta name="viewport" content="width=device-width, initial-scale=1.0" />
    <link rel="stylesheet" href="index.css" />
    <script src="index.js" defer></script>
    <title>The Maze</title>
  </head>
  <body>
    <!-- ... -->
  </body>
</html>
Step 2 - Setting up the HTML
This part is a simple one, as we would just include a <canvas> element:
<body>
    <canvas id="canvas"></canvas>
</body>
The <canvas> has an id attribute set to "canvas," which would serve as the visual display of the maze gameboard. We will manipulate this canvas entirely using JavaScript.
If you're unfamiliar with HTML Canvas, you can read how it works here or here. However, I will explain the process of using the canvas element, so you can easily follow along.
Step 3 - Setting up the CSS
In the index.css file, let's add some basic styling:
* {
  box-sizing: border-box;
  margin: 0;
  padding: 0;
}

body {
  width: 100vw;
  height: 100vh;
  display: grid;
  place-content: center;
}
Step 4 - Get the canvas element and set its dimensions
In this step, we will focus on adding some essential setups for the canvas:
const canvas = document.querySelector("#canvas");
const dimension = Math.floor(
  Math.min(
    document.documentElement.clientWidth,
    document.documentElement.clientHeight
  ) * 0.9
);
canvas.width = dimension;
canvas.height = dimension;
The canvas element with
id=canvas(created in Step 2) is retrieved and stored in thecanvasvariable.For responsiveness on different screens, we need to determine the dimensions of the user's screen.
Math.min()would get the minimum value between the client's viewport width (document.documentElement.clientWidth) and height (document.documentElement.clientHeight). Thenmath.floor()would convert the result into a whole number.The derived value is then multiplied by 0.9. This is done to reduce the dimension by 10%, making it slightly smaller than the viewport size. This is done for UI sake, so it is optional.
The
canvas.widthandcanvas.heightare set to the calculateddimension, as this results in a square shape for the gameboard that fits the user's screen.
Step 5 - Get the 2D drawing context of the canvas
const ctx = canvas.getContext("2d");
The canvas.getContext("2d") is a method for setting up a drawing environment for the canvas. It basically provides methods and properties needed to create 2D visuals on the canvas.
Note: In this tutorial, the terms "grid," "canvas," and "gameboard" are all used interchangeably. They all refer to the visual display of the maze.
Step 6 - Render the gameboard
Let's render the gameboard in the browser:
ctx.strokeRect(0, 0, canvas.width, canvas.height);
The method ctx.strokeRect() is used to draw the lines of a rectangle on the canvas, and it accepts four arguments: x, y, width, and height.
In this case, both x and y are 0, which means the drawing of the gameboard should begin at the top-left corner of the canvas. And stretch across the entire width (canvas.width) and height (canvas.height) of the canvas.
Step 7 - Specify cell row, column and size.
To create a maze, we need cells that would fill the gameboard in a grid format. Thus, we first have to specify the number of cells in each row and column of the grid, as well as the size of each cell.
let cellCount = 5;
const cellSize = canvas.width / cellCount;
The cellCount variable is set to 5, in which case there would be 5 cells in a row and 5 cells in a column on the gameboard.
For the size of each cell, the width of the canvas is divided by the cellCount. This returns the precise pixel size needed for each cell to fit perfectly within the grid.
For instance, if
canvas.widthis 200px andcellCountis 5, each cell will have acellSizeof 40px in width and height.
Step 8 - Create the cells template
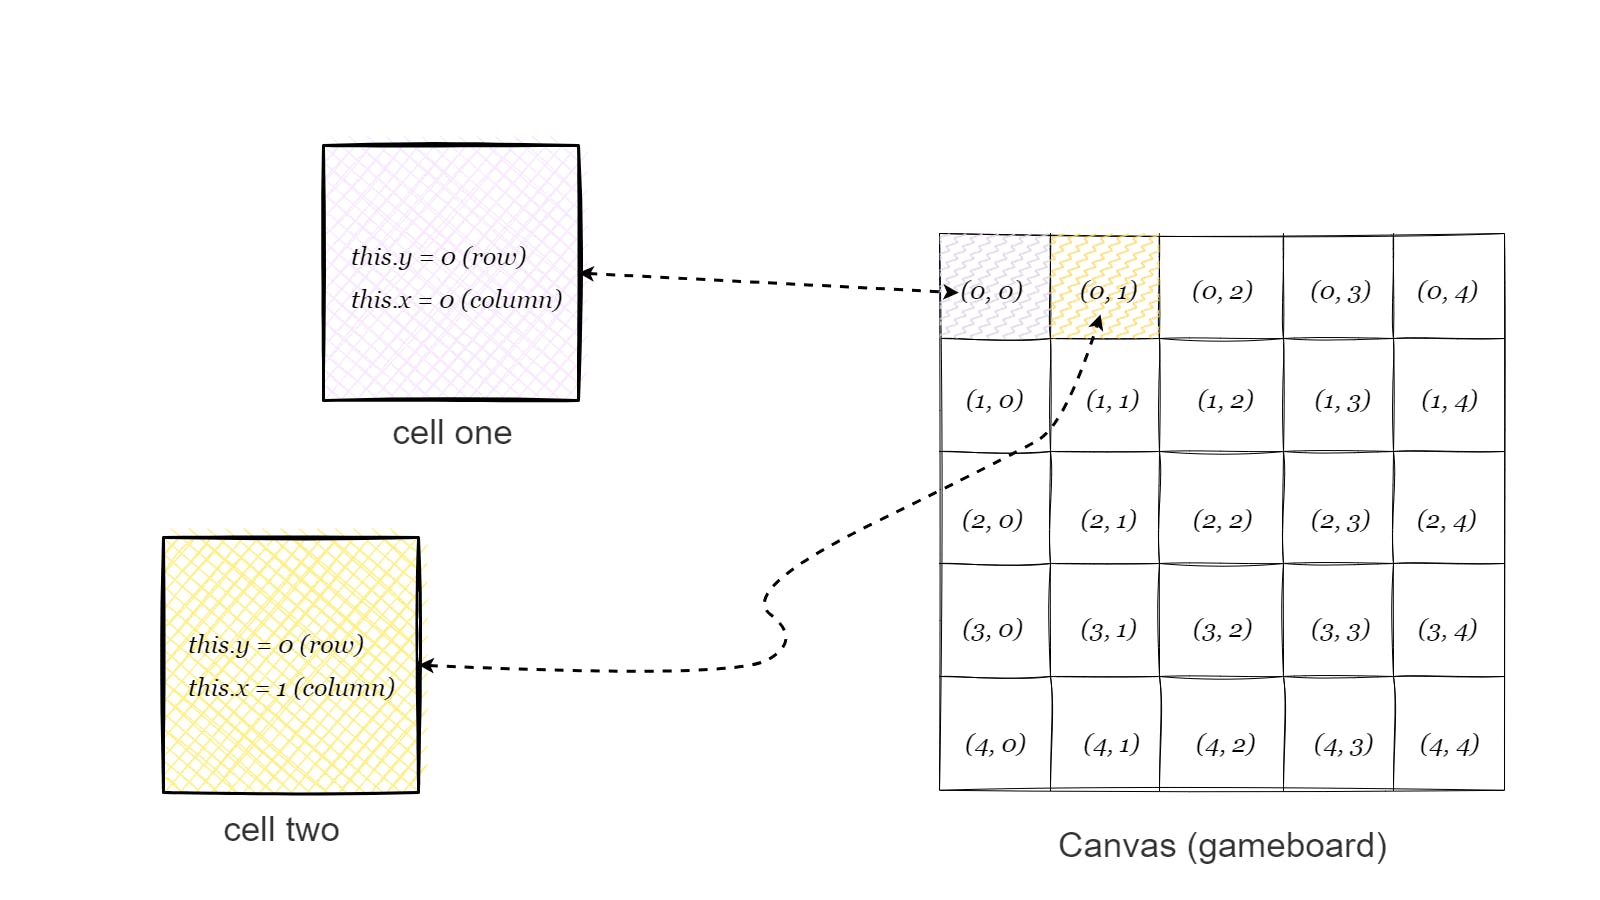
We need a cell template that will create as many cells as needed to form the grid structure. Each cell will have a location in terms of columns and rows and a set of walls that can be removed to create paths between cells.
class Cell {
  constructor(x, y) {
    this.x = x;
    this.y = y;
    this.walls = { top: true, right: true, bottom: true, left: true };
  }
}
A
Cellclass is created, and each cell created using this class would have anxandyvalue which acts as the column and row location of the cell.For instance, a cell in the grid can be in "column 2 row 4"; in such a case, x is 2 and
yis 4.
- Also, each cell has a
wallsproperty.this.wallsspecifies the presence or absence of walls on each side of the cell. By default, all walls are set totrue, meaning the cell is surrounded by walls.
By turning cell walls sides to false, openings are created between cells, and gradually, a maze begins to form.
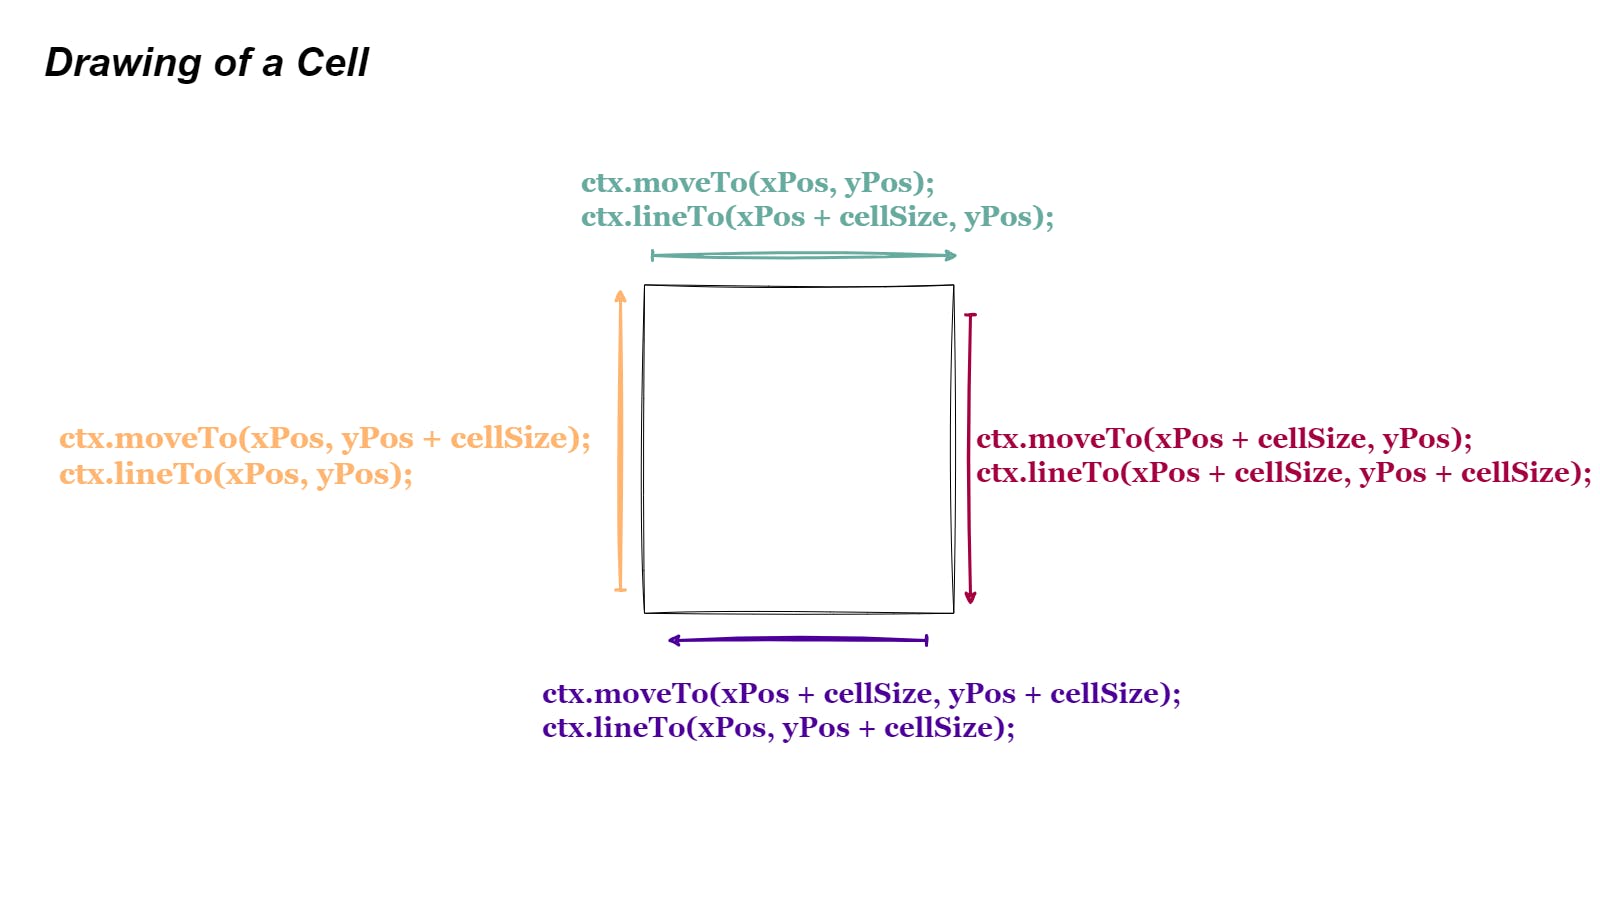
Step 9 - Create a method to render the cell
Currently, we know how to specify a cell's location (this.x, this.y), but how can the cells be drawn on the canvas? To do this, we create a method, drawCell():
class Cell {
  // ...

  drawCell() {
    const xPos = this.x * cellSize;
    const yPos = this.y * cellSize;
    ctx.beginPath();
    if (this.walls.top) {
      ctx.moveTo(xPos, yPos);
      ctx.lineTo(xPos + cellSize, yPos);
    }
    if (this.walls.right) {
      ctx.moveTo(xPos + cellSize, yPos);
      ctx.lineTo(xPos + cellSize, yPos + cellSize);
    }
    if (this.walls.bottom) {
      ctx.moveTo(xPos + cellSize, yPos + cellSize);
      ctx.lineTo(xPos, yPos + cellSize);
    }
    if (this.walls.left) {
      ctx.moveTo(xPos, yPos + cellSize);
      ctx.lineTo(xPos, yPos);
    }
    ctx.stroke();
  }
}
drawCell()begins by calculating (xPosandyPos), which are derived by the cell's location (this.xandthis.y) multiplied by thecellSize. These variables denote the starting point of the cell on the canvas.For example, if the
cellSizeis 20px and thexlocation is 0, the starting point would be 0px. Similarly, if thexlocation is 1, the starting point would be 20px and so on.Next, it uses
ctx.beginPath()to start drawing the cell on the canvas. This is like when a pencil touches a piece of paper to start drawing.The
ifstatements check if a side of the cell's walls should be present and draws a line if true.To draw, we use
ctx.moveTo()which acts as the starting point of a line andctx.lineTo()which acts as the ending point of a line.For the top side of the walls,
drawCell()moves the starting point of the line to the top-left corner of the cell usingctx.moveTo(xPos, yPos)and draws a horizontal line to the top-right corner of the cell usingctx.lineTo(xPos + cellSize, yPos).For the right side, it moves the starting point to the top-right corner using
ctx.moveTo(xPos + cellSize, yPos)and draws a vertical line to the bottom-right corner usingctx.lineTo(xPos + cellSize, yPos + cellSize).For the bottom side, it moves the starting point to the bottom-right corner using
ctx.moveTo(xPos + cellSize, yPos + cellSize)and draws a horizontal line to the bottom-left corner usingctx.lineTo(xPos, yPos + cellSize).For the left side, it moves the starting point to the bottom-left corner using
ctx.moveTo(xPos, yPos + cellSize)and draws a vertical line to the top-left corner usingctx.lineTo(xPos, yPos).And finally,
ctx.stroke()is called, which renders the lines on the canvas.
Moving forward, to draw a cell when it is created, we can invoke drawCell() in the constructor:
class Cell {
  constructor(x, y) {
    this.x = x;
    this.y = y;
    this.walls = { top: true, right: true, bottom: true, left: true };
    this.drawCell(); // Auto-invoked on new cell creation
  }
  // ...
}
Step 10 - Fill the gameboard with cells
To fill up the canvas with cells, we can use for loops:
const noOfRows = cellCount;
const noOfCols = cellCount;
const gridCells = [];

function createCells() {
  // Draw the gameboard
  ctx.strokeRect(0, 0, canvas.width, canvas.height);
  // Fill the gameboard with cells
  for (let y = 0; y < noOfRows; y++) {
    for (let x = 0; x < noOfCols; x++) {
      const cell = new Cell(x, y);
      gridCells.push(cell);
    }
  }
}

createCells();
Let's break it down:
For the sake of clarity, variables -
noOfRowsandnoOfColshave been assigned to the value ofcellCount. They show how many rows and columns there are in the grid.The
gridCellsarray is created to store all the cells built using theCellclass.Inside
createCells(), we move the code from Step 5 (ctx.strokeRect()) into this function. This achieves code efficiency.The
forloops iterates over each row and column of the grid. Basically, for each row, there would be a specified number of columns.The outer loop iterates over each row; it sets
yto 0 and continues for as long asyis less thannoOfRows.The inner loop iterates over each column; it sets
xto 0 and continues for as long asxis less thannoOfCols.Within the inner
forloop, a new cell is created usingnew Cell(x, y). This creates a cell at the specificxandylocations within the grid.The newly created cell is then stored in
gridCellsusinggridCells.push(cell)allowing us to keep track of and modify the cells in the grid later on.
Tip: Increase
cellCountvalue to make the maze grow in size.
Step 11 - Create the DFS algorithm
In simpler terms, this is how the DFS algorithm works:
It starts at a random cell in the grid and marks it as visited.
It looks around from that cell and picks any unvisited adjacent cells.
It follows this path until it reaches a cell with no unvisited adjacent cells.
When this happens, it backtracks to the previous cell that had unvisited adjacent cells.
It then picks an unvisited adjacent cell and repeats #2 to #4.
This process continues until every cell in the grid has been visited.
The DFS algorithm would lie inside a function:
let currentCell;

function dfs(cell) {
  currentCell = cell;
}

dfs(gridCells[0]); // Start DFS from the first cell
Not much is currently happening in this code yet. The cell parameter acts as the active cell that the DFS algorithm is about to visit. currentCell then gets assigned to cell which means the cell is currently being visited.
Step 12 - Mark currentCell as visited
To track cells that have been visited by DFS, let's modify the Cell constructor to include a new property called visited:
class Cell {
  constructor(x, y) {
    this.x = x;
    this.y = y;
    this.visited = false; // new property
    this.walls = { top: true, right: true, bottom: true, left: true };
    this.drawCell();
  }
  // ...
}
Now, every cell in the grid has a visited property which is set to false by default. When DFS visits a cell, it sets the visited property of that cell to true:
function dfs(cell) {
  currentCell = cell;
  currentCell.visited = true;
}
This helps keeps track of cells that have been visited which aids DFS during the maze generation process.
Step 13 - Get adjacent cells of the current cell
On visiting the current cell, we need a way to move to the next cell. That is we need to get cells that are neighbors to currentCell i.e. adjacent cells.
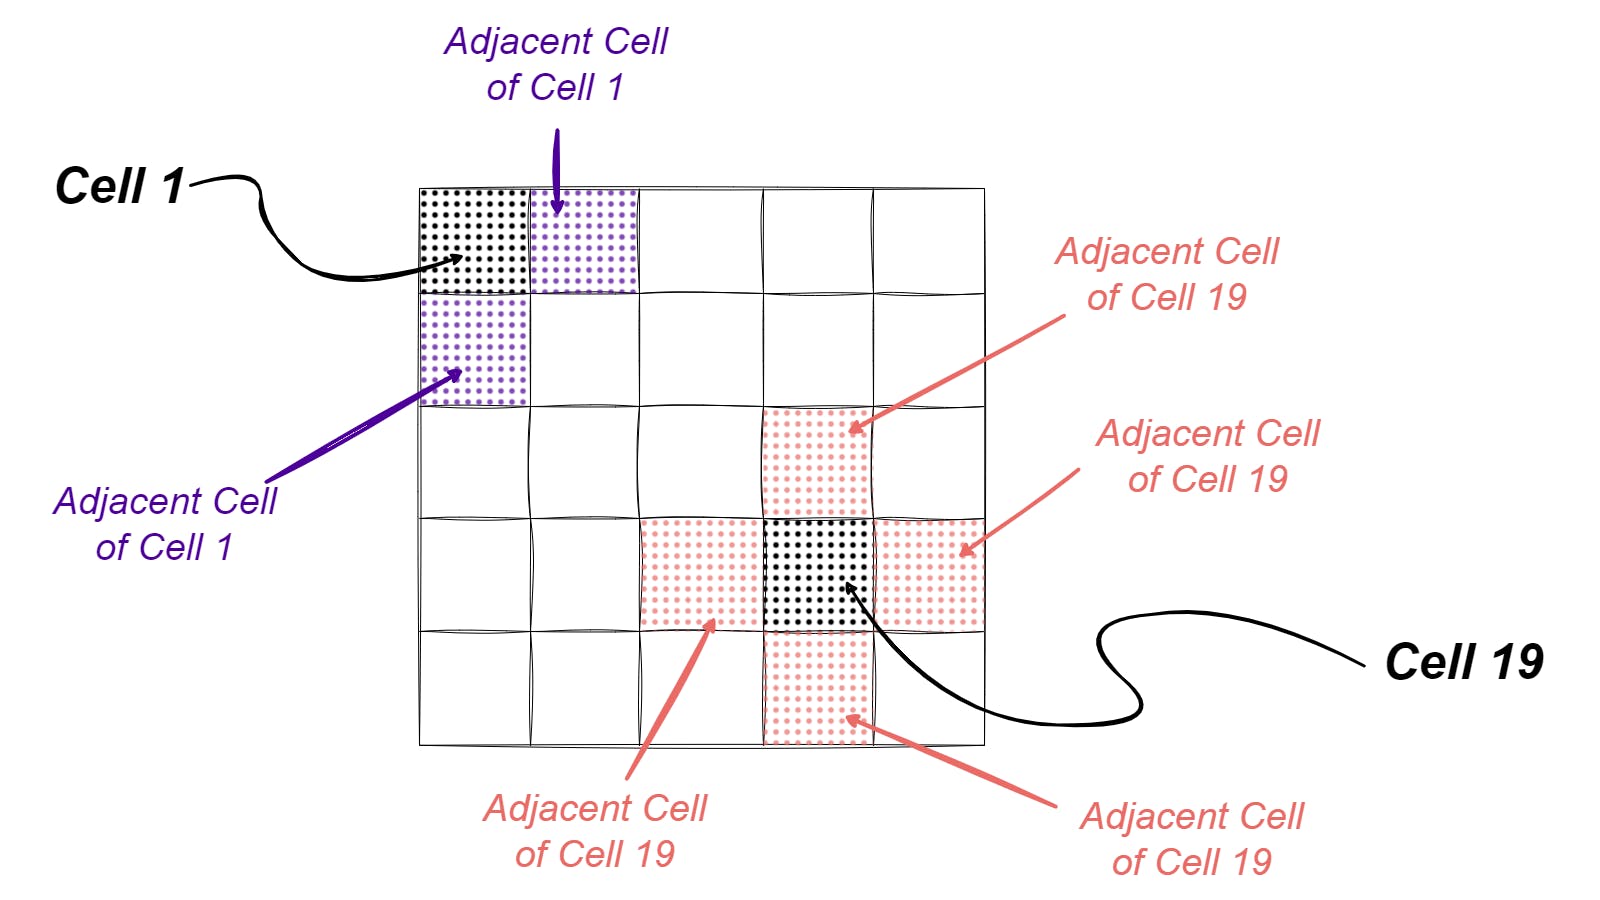
Here is the code:
let gridHasUnvisitedCells;

function dfs(cell) {
  currentCell = cell;
  currentCell.visited = true;
  gridHasUnvisitedCells = gridCells.some((e) => !e.visited);
  if (gridHasUnvisitedCells) {
    const cellNeighbors = getAdjacentCells(currentCell);
  } else {
    // more on this in step 24
  }
}
Let's break this down:
gridHasUnvisitedCellsis declared (as a global variable; it'd be needed in Step 25). It keeps track of whether any grid cells are still unvisited.gridCells.some((e) => !e.visited)returnstrueif at least one cell ingridCellshasn't been visited; otherwise, it returnsfalse.If
gridHasUnvisitedCellsistrue, it means there are more cells to explore; iffalse, DFS moves to Step 24.Assuming there are still unvisited cells,
getAdjacentCells()is called, andcurrentCellis passed as a parameter. This function returns the adjacent cells of the current cell.
Let's create the getAdjacentCells() in the next Step.
Step 14 - Create getAdjacentCells function
function getAdjacentCells(cell) {
  const { x: col, y: row } = cell;
  const cellIndex = gridCells.indexOf(cell);
  const adjacentCells = {};

  if (row > 0) adjacentCells.top = gridCells[cellIndex - noOfCols];

  if (row < noOfRows - 1) adjacentCells.bottom = gridCells[cellIndex + noOfCols];

  if (col > 0) adjacentCells.left = gridCells[cellIndex - 1];

  if (col < noOfCols - 1) adjacentCells.right = gridCells[cellIndex + 1];

  return adjacentCells;
}
First, destructure the
cellparameter to extract thexandyproperties, i.e. the column and row of the cell.cellIndexgets the index of wherecellis within thegridCellsarray by using theindexOf()method.The empty object,
adjacentCellswould store all adjacent cells of the current cell.The subsequent
ifstatements check if the cell is not at the edges of the grid. Iftrue, it means there are adjacent cells in that particular direction.The first
ifchecks if the cell row is greater than 0, i.e. if it's not in the topmost row. Iftrue, we get the index of the adjacent cell above by subtractingnoOfColsfrom thecellIndex. This index is then used to retrieve the top adjacent cell ofcell.The next
ifcheck if the cell row is less thannoOfRows - 1, i.e. if it's not in the bottommost row. Iftrue, we get the index of the adjacent cell below by addingnoOfColsto thecellIndex. This index is then used to retrieve the bottom adjacent cell ofcell.The next
ifcheck if the cell column is greater than 0, i.e. if it's not in the leftmost row. If true, we get the index of the adjacent cell on the left by subtracting 1 from thecellIndex. This index is then used to retrieve the left adjacent cell ofcell.The last
ifcheck if the cell column is less thannoOfCols - 1, i.e. if it's not in the rightmost row. If true, we get the index of the adjacent cell on the right by adding 1 to thecellIndex. This index is then used to retrieve the right adjacent cell ofcell.Finally, we return the
adjacentCells.
Step 15 - Get unvisited adjacent cells
Once the adjacent cells of currentCell has been retrieved using getAdjacentCells(), we need to check if any cells among them have not been visited yet.
function dfs(cell) {
  // ...
  if (gridHasUnvisitedCells) {
    const adjacentCells = getAdjacentCells(currentCell);
    const unvisitedAdjacentCells = Object.values(adjacentCells).some(
      (e) => !e.visited
    );
  }
  // ...
}
Using Object.values(), we retrieve all the cell objects from adjacentCells i.e. without their keys. Then, chain the some() method to the returned array from Object.values() as this checks if there is any cell in adjacentCells that hasn't been visited.
Step 16 - Create the stack
In the DFS algorithm, a stack keeps track of the order of cells being explored and aids backtracking when needed.
const stack = [];

function dfs(cell) {
  // ...
  if (gridHasUnvisitedCells) {
    const adjacentCells = getAdjacentCells(currentCell);
    const unvisitedAdjacentCells = Object.values(adjacentCells).some(
      (e) => !e.visited
    );
    if (unvisitedAdjacentCells) {
      stack.push(currentCell);
    } else {
      // Backtrack by popping the last cell from the stack
      // ... more on this in step 23
    }
  }
}
An empty stack array is created. Then, if (unvisitedAdjacentCells){} returns true, it means there's a path to explore further. Thus, the currentCell is pushed to the stack and we move to the next step.
However, if (unvisitedAdjacentCells){} returns false, it indicates a dead end and the else block is executed. Here, the last cell would be removed from the stack using stack.pop(). This continues in Step 23.
Step 17 - Determine the next Cell to visit
This step would select the next cell to visit from the available unvisited adjacent cells.
function dfs(cell) {
  // ...
  if (unvisitedAdjacentCells) {
    stack.push(currentCell);
    const unvisitedDirections = Object.keys(adjacentCells).filter(e => !adjacentCells[e].visited);
    const nextCellDirection = unvisitedDirections[Math.floor(Math.random() * unvisitedDirections.length)];
    const nextCell = adjacentCells[nextCellDirection];
  } else {
    // ...
  }
}
Object.keys(adjacentCells)retrieves the keys (directions) of the adjacent cells and filters out the directions for cells not visited yet. The result would be an array of unvisited adjacent directions for the current cell.Next, randomly select a direction from the
unvisitedDirections. The random direction is then assigned tonextCellDirection.With the
nextCellDirection, we can easily derive thenextCellfrom theadjacentCellsby usingadjacentCells[nextCellDirection].
Note:
nextCellDirectionis crucial as it is needed to remove the walls between thecurrentCellandnextCell.
Step 18: Create a function to remove cell walls
This step involves tearing down the walls between cells to create a path.
Let's add a removeWalls() method to the Cell class:
class Cell {
  // ...

  removeWalls(direction, adjacentCell) {
    const opposite = {
      top: "bottom",
      right: "left",
      bottom: "top",
      left: "right"
    };
    this.walls[direction] = false;
    adjacentCell.walls[opposite[direction]] = false;
  }
}
Let's break it down:
The method starts by creating an object,
oppositeto store opposite directions for each specifieddirection. For example, ifdirectionis "top", then the opposite is "bottom".This object helps to determine which walls to remove in both the current cell and the next cell, as this is how paths are created.
this.walls[direction]sets the specifieddirectionof the current cell (this) walls tofalse. This means the wall in that direction should be removed.nextCell.walls[opposite[direction]]initially get the opposite direction ofdirection. Then, the wall ofnextCell(that faces the current cell) is set to false, thereby also removing the wall.
Step 19: Remove the walls between currentCell and nextCell
Let's remove the necessary walls:
function dfs(cell) {
  // ...
  if (unvisitedAdjacentCells) {
    stack.push(currentCell);
    const unvisitedDirections = Object.keys(adjacentCells).filter(e => !adjacentCells[e].visited);
    const nextCellDirection = unvisitedDirections[Math.floor(Math.random() * unvisitedDirections.length)];
    const nextCell = adjacentCells[nextCellDirection];

    currentCell.removeWalls(nextCellDirection, nextCell);
  } else {
    // ...
  }
}
With the currentCell invoking removeWalls(nextCellDirection, nextCell) with the proper arguments, it is certain the appropriate walls of both currentCell and nextCell has been removed and a path has been formed.
However, the effect isn't visible in the browser. Let's fix that in the next step.
Step 20 - Redraw the canvas to show changes
The HTML Canvas is like a drawing board, and updating anything drawn on it requires clearing the canvas and redrawing it with the update applied.
function redraw() {
  ctx.clearRect(0, 0, canvas.width, canvas.height);
  gridCells.forEach((e) => e.drawCell());
}
This function begins by erasing the entire canvas of any existing content using
ctx.clearRect().clearRect()is the opposite ofstrokeRect()used in Step 6; it clears the canvas.Then
forEach()is used to iterate over each cell ingridCellsarray, which invokes thedrawCell()to redraw the cells with the applied changes on the canvas.
All that is left is to invoke redraw() in the dfs algorithm function.
function dfs(cell) {
  // ...
  if (unvisitedAdjacentCells) {
    stack.push(currentCell);
    const unvisitedDirections = Object.keys(adjacentCells).filter(e => !adjacentCells[e].visited);
    const nextCellDirection = unvisitedDirections[Math.floor(Math.random() * unvisitedDirections.length)];
    const nextCell = adjacentCells[nextCellDirection];
    currentCell.removeWalls(nextCellDirection, nextCell);

    redraw();
  } else {
    // ...
  }
}
By invoking redraw(), the updated path will be displayed in the web browser.
Step 21 - Turn the next cell to the current cell
This step's purpose is to assign the currentCell to the nextCell and reinvoke the dfs() with the new currentCell.
function dfs(cell) {
  // ...
  if (unvisitedAdjacentCells) {
    stack.push(currentCell);
    const unvisitedDirections = Object.keys(adjacentCells).filter(e => !adjacentCells[e].visited);
    const nextCellDirection = unvisitedDirections[Math.floor(Math.random() * unvisitedDirections.length)];
    const nextCell = adjacentCells[nextCellDirection];
    currentCell.removeWalls(nextCellDirection, nextCell);
    redraw();

    currentCell = nextCell;
    dfs(currentCell);
  } else {
    // ...
  }
}
By recursively invoking dfs() with the new currentCell, the process restarts from step 13, thus creating paths as it visits cells.
Step 22 - Add visuals to the gameboard
First, let's slow down the DFS algorithm to see it in action:
//dfs(currentCell);
setTimeout(dfs, 100, currentCell);
Next, let's visualize the current cell when DFS is running:
function highlight(cell, color) {
  const xPos = cell.x * cellSize;
  const yPos = cell.y * cellSize;
  ctx.fillStyle = color;
  ctx.fillRect(xPos, yPos, cellSize, cellSize);
}
highlight()basically takes the cell passed to it and colorizes it.It calculates the positions of the cell on the canvas based on its
xandylocations.Then
ctx.fillStyle = colorsets the specifiedcoloron anything drawn next on the canvas.Finally, the
ctx.fillRect()would draw the cell by passing in the appropriate arguments.
Note: On the gameboard, the highlighted cell is drawn on top of its original cell. Think of it as placing a cell clone on top of the original.
Next, place and invoke highlight() (with currentCell and a chosen color) inside redraw():
function redraw() {
  ctx.clearRect(0, 0, canvas.width, canvas.height);
  gridCells.forEach((e) => e.drawCell());

  highlight(currentCell, 'green');
}
Note:
currentCellis a global variable frequently updated by thedfsalgorithm; this allowshighlight()to access the precise current cell.
Step 23 - Backtracking
We are close to setting up the DFS algorithm. But, when you look at the gameboard, you'd see that the algorithm keeps stopping at a particular cell and doesn't create the full maze. This is because it has gotten to a dead end where all the adjacent cells of the current cell have been visited.
To fix this we use a technique called Backtracking. This basically means the algorithm should go back through the path it came from which is possible because of the stack array.
Now we continue the dfs algorithm from step 16:
function dfs(cell) {
  // ...
  if (gridHasUnvisitedCells) {
    const adjacentCells = getAdjacentCells(currentCell);
    const unvisitedAdjacentCells = Object.values(adjacentCells).some(
      (e) => !e.visited,
    );
    if (unvisitedAdjacentCells) {
      stack.push(currentCell);
      // ...
    } else {
      // Backtrack by popping the last cell from the stack
      stack.pop();
      currentCell = stack[stack.length - 1];
      redraw();
      setTimeout(dfs, 100, currentCell);
    }
  }
}
Let's break down the backtracking:
When there are no unvisited adjacent cells for the
currentCell, DFS backtracks by usingstack.pop()to remove the last cell that was added, in this case, thecurrentCell.After which
currentCellis reassigned to the cell at the top of the stack by usingstack[stack.length - 1].At this point, backtracking has occurred as the algorithm has gone back one cell.
Then,
redraw()is reinvoked to update the canvas.And lastly,
dfsis reinvoked with the newcurrentCellthroughsetTimeout; thus the process repeats from Step 13.
Finally, the DFS algorithm is complete and a fully generated maze would display on the browser.
Solving the Maze
Now that the maze has been generated, it can also be solved by leveraging the versatility of the DFS algorithm. Let's see how that works step by step:
Step 24: Create the solveMaze function
This function is where the code for solving the maze would dwell.
function solveMaze(activeCell, endCell) {
  if (activeCell === endCell) {
    alert("Found end");
    return;
  }
}
solveMaze() takes two parameters: activeCell, which would act as the currentCell being visited, and endCell, which is the target cell that denotes the end of the maze.
The function checks if (activeCell === endCell); if true, it means that the algorithm has reached the end of the maze, and a message is displayed to indicate the maze has been solved. After which the function returns, thereby ending the solving process.
However, if the activeCell is not at the endCell, the algorithm proceeds to the next step.
Step 25: Create a Set to store visited cells
For the algorithm to remember cells it has visited during maze solving, JavaScript Set object can be used. Set is used to store unique values to ensure duplicates are not allowed, and in this case, each cell is unique. This is equivalent to how each cell has a visited property in Step 12 during maze generation.
const visitedCells = new Set(); // Create an empty Set
function solveMaze(activeCell, endCell) {
  if (activeCell === endCell) {
    alert("Found end");
    return;
  }
  currentCell = startCell;
  visitedCells.add(currentCell);
}
visitedCellsobject is an emptySetobject that keeps track of visited cells.As usual, to keep things easier to follow,
currentCellis assigned to theactiveCell.Next,
currentCellis added to thevisitedCellsSetobject by usingadd(). By doing this, it implicitly marks the cell as visited.
Step 26: Get unvisited paths from the current cell
Moving forward, we need to find out which direction of the currentCell has possible paths. After this, we identify which of the possible paths the algorithm has gone through and which it hasn't.
const visitedCells = new Set(); // Create empty Set

function solveMaze(activeCell, endCell) {
  // ...
  const adjacentCells = getAdjacentCells(currentCell);
  const unvisitedPaths = Object.keys(currentCell.walls)
    .filter((path) => !currentCell.walls[path])
    .filter((path) => !visitedCells.has(adjacentCells[path]));
}
First of all, we use
getAdjacentCells()from Step 14 to get all the cells adjacent to thecurrentCell.Then we get all the directions of
currentCellwalls by usingObject.keys(currentCell.walls). The returned array is then filtered to extract only the directions with walls set to false,filter((path) => !currentCell.walls[path]). The array returned would contain the possible paths the algorithm can take from thecurrentCell.Furthermore, another
filter()is chained to the result. This code,filter((path) => !visitedCells.has(adjacentCells[path]))sole purpose is to filter through all the possible paths derived and return only the paths that haven't been visited.adjacentCells[path]extract the cell in a given path, then the derived cell is checked throughvisitedCellsSet object and only the cells that have not been visited are returned.
Step 27: Check for unvisited paths from the current cell.
This step handles the majority of the maze-solving. Plus, it is fairly simple to understand as it is similar to the maze generation process, whereby it goes along an available path, backtracks when it reaches a dead end and continues on another available path until it finds the endCell.
const pathStack = [];
function solveMaze(startCell, endCell) {
  // ...

  if (unvisitedPaths.length > 0) {
    const nextPath =
      unvisitedPaths[Math.floor(Math.random() * unvisitedPaths.length)];
    const nextCell = adjacentCells[nextPath];
    currentCell = nextCell;
    pathStack.push(currentCell);
  } else {
    pathStack.pop();
    currentCell = pathStack[pathStack.length - 1];
  }
}
Let's break this down:
pathStackarray is similar to thestackarray used for generating the maze. It stores the cells' order that formed the path the algorithm is exploring.The
ifstatement checks if there areunvisitedPathsavailable from thecurrentCell, if true, it goes further with exploration; if false, it means a dead end, and it backtracks.Starting with the
ifblock, a random path among the availableunvisitedPathsis selected and assigned to thenextPathvariable.The
nextPathcontains a particularunvisitedpath. Thus, to find the cell on that path,nextPathis passed intoadjacentCellswhich returns the cell in the direction ofnextPath; this becomes thenextCellto visit.currentCellis then reassigned tonextCelland pushed topathStack, which continues at Step 28.However, the else block gets executed when there are no
unvisitedPathspresent from thecurrentCellthereby backtracking has to occur, which is done by popping the last cell added topathStack.Then the
currentCellgets updated to the previous cell, which is obtained frompathStack[pathStack.length - 1].
Step 28: Finalize the solveMaze function
This is the final step of solving the maze, as it entails updating the canvas, highlighting the path, and recursively invoking the solveMaze function.
const pathStack = [];
function solveMaze(startCell, endCell) {
  // ...

  redraw();
  pathStack.forEach((cell) => highlight(cell, "#00000050"));
  setTimeout(solveMaze, 300, currentCell, endCell);
}
After updating the currentCell and pathStack respectively, depending on if there are unvisitedPaths or not, redraw() is invoked to clear up the canvas and update the maze.
As a plus for visual purposes, we iterate over each cell in the pathStack and highlight them with a semi-transparent black color by using highlight(). This would highlight the cells along the path taken by the algorithm.
Then, setTimeout is called to invoke solveMaze() recursively with a 300ms delay by passing currentCell and endCell as arguments to solveMaze().
Finally, invoke solveMaze() in the else block in Step 13, which executes when gridHasUnvisitedCells returns false, indicating that the maze has been generated.
function dfs(cell) {
  // ...
  if (gridHasUnvisitedCells) {
    // ...
  } else {
    // maze generated completely
    // Proceed to solve the maze
    solveMaze(gridCells[0], gridCells[gridCells.length - 1]);
  }
}
That's it! The generated maze will solve itself by also using the DFS algorithm. The solveMaze() only stops recursively calling itself when activeCell is equal to endCell (from Step 24).
Conclusion
This tutorial was extremely in-depth but necessary to understand the inner workings of the Depth-First Search algorithm and how it's used for generating and solving mazes.
The tutorial's source code is available here. Also, think about adding levels and customizing the maze's appearance.